Level 1 of the Abyss was quite straightforward. There was a series of rooms with Lava Lizards followed by another series with Daemons surrounded by magical fields. The party trudged its way through to the first altar. I had forgotten that one needs to answer questions and then use the appropriate stone color. Thankfully, I know the game so well that the answers were easy.

Level 2 had rooms of sea creatures and was relatively straightforward. After you answer the question correctly and use the stone at an altar, it changes into a ladder going down.

The first room in Level 3 was rather surprising. It was empty! I don't know if this is a bug.

In the second room, however I wondered if this was another endless Daemon horde. I stuck around for the fight and it turned out there was a finite number of them after all. They were just stacked on a single square.

Level 4 is a little sneaky if you don't peer at a gem or cast a View spell right away. Instead of the obvious room door on the south side, one needs to actually take the secret passage east. In one of these passages the party ran into a troll. A battle in a secret passage looks odd.

After defeating the lone troll, there were just two rooms to cross before the altar where I used the green stone.

Level 5 is where things start to get interesting and tedious. After a couple of tremor spells, the denizens behind the electric fields were reduced to a Zorn and a Balron. Because of the Zorn's ability to negate magic, I had to wait for it to walk through the walls until I could destroy it. Thereafter, I just had to trigger open the secret passage southwards.

The room with the ten Reapers turned out not to be as bad as in my journey 27 years ago. I remembered this room well. After two Tremors and a Negate Magic spell, the party slowly polished off the remaining evil creatures. Jaana triggered open the passage southwards.


The room with dragons in the foothills was slow going. Eventually we defeated them and I opened the eastward passage.


Level 6 is a bugbear if you have not done it before. It was lodged in my memory 27 years ago (after many mistakes) that to navigate through the maze, one needed to head east through the secret passage.

The most tedious room in my visit down the Stygian Abyss was the one below. I did not want to Negate Magic because I needed to Dispel the electric fields to trigger open the secret passage southwards. My Tremor spells failed to kill any of the three Balrons resulting in much falling asleep before I was eventually able to eliminate them.

It was in the next room that I made a significant error because it was getting late and I was not alert. I was not keeping good track of where I was in the maze and did not think that fighting the Hydras and the Balron was needed. I walked out west and the passageway closed behind me into a room I had visited before that I knew was not the right way forward. As a result I had to go through the maze a second time including the room above! I was prepared the second time around.


We took the south exit and easily defeated a group of Headless. I have a vague memory that this is easier than the room to the east but I did not bother to check. The final room in the maze was relatively straightforward. It was then a short distance to the altar where I used the purple stone. The party had a rest after the maze of rooms.

Level 7 had a number of interesting triggers. The first room had a treasure chest in the middle. After defeating the room's occupants the party walked straight across westwards. The minute I stepped on the middle treasure chest, electric fields appeared around me. Thankfully I had a supply of Dispels ready and was able to easily get out. I left the Gold alone.

In another room, I almost managed to sneak through without letting out the denizens but Iolo managed to trigger one wall open. The group quickly made short work of the Hydra.

Another interesting room gave me a great opportunity to cast a Jinx spell. By the time the spell wore off, only one Ghost and one Phantom were left. Jaana and Katrina stood in the appropriate locations to open up the appropriate exits.


Level 8 is another reason why you should really peer at a gem or View.

I picked the southward passage in the first cluster of rooms. In the second room, I knew there had to be a passageway west but I could not remember the trigger location. I assumed it would be in the lava, so Jaana and I both took plenty of damage exploring every single square. Nothing! It turned out that if Geoffrey had just walked one square south, many hit points would have been saved.

After finding the first triggering space, Jaana went back into the lava to hit the second trigger.

The first room in the second cluster was the "mirror image" room except it is not quite a mirror image as you can see. I killed my "opposite mage" with a single blow from my Magic Wand. The mirror image as you can see is based on the order of the virtues from Honesty to Humility. I wonder what it would do if the avatar was not a mage. This room was probably the easiest battle and my party took no damage.

The next room required me to find a passageway east. Shamino found the first trigger resulting in a secret passage "wall" revealing itself in the southeast corner.

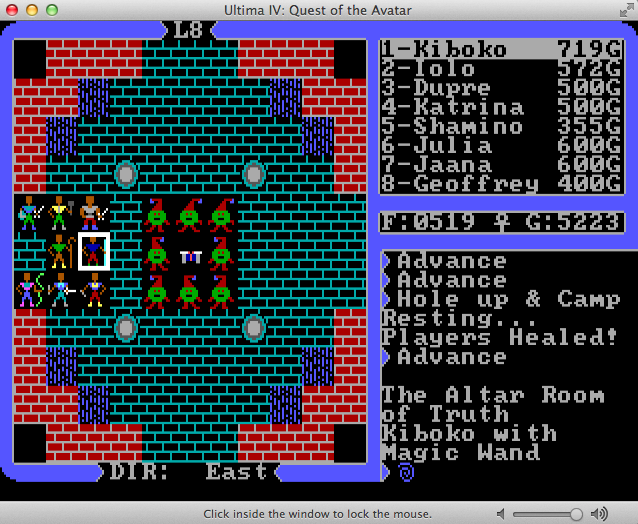
I finally made it to the last altar. Upon using the stone, all my companions "vanished".

I "used" the Three Part Key automatically. (I don't know what would happen at this point if I did not have it.)

Thankfully, I do know the word of passage, at which point I was asked a series of questions about the virtues. They do not bother to mix up the questions so everything follows the same order from Honesty to Humility.

As I answered each question correctly, a figure started to be drawn on the screen with each correct answer.
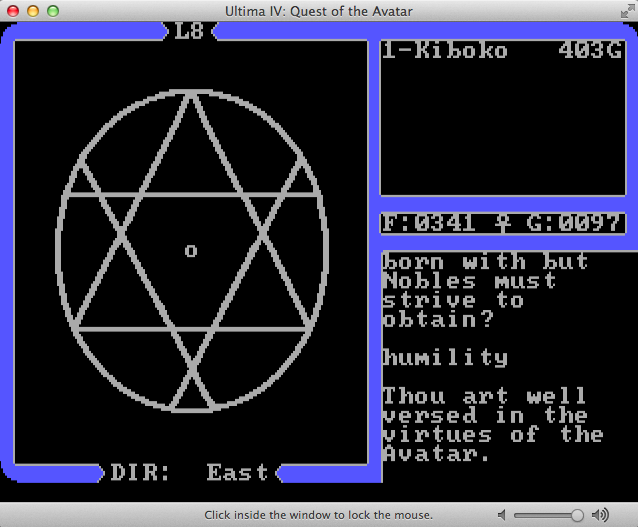
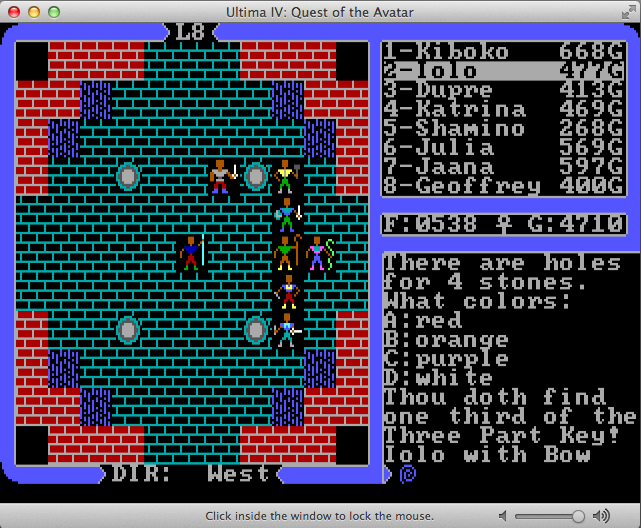
Apparently I am well versed in the virtues. I then had to identify the three principles of Truth, Love and Courage. (Interestingly the only time things are out of sequence is in the use of the Bell followed by the Book followed by the Candle at the entrance to the Abyss.)

After more rumbling, the final question was asked. Answering it correctly revealed the infinity symbol which curiously is also a sideways "8" (for the 8 virtues).

After a bunch of endgame text in which I was transported back to my own world, I reached the final screen. The journey had taken three hours in real time. My quest had come to an end.

45650 moves. Cumulative playing time = 27 hours.